Friday, March 29, 2019

Spring is in the air but dragging her feet

Two sure signs of Spring on the west coast are fog and the pervasive earthy smell of manure. Fog normally cruises in the evening and crawls out slowly in the morning. The view from the house which sits on a 100m knoll is simply ethereal on some mornings.


As for the manure there's just no escaping it, most are super glad that it stays in the field and the wind  always blow in a favorable direction.

Sunday, March 24, 2019

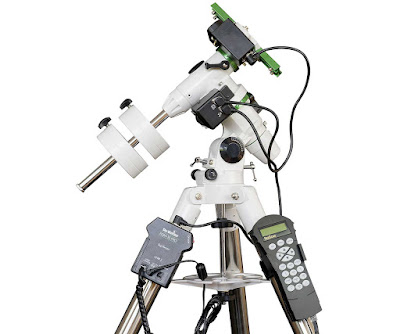
Skywatcher EQM 35 Pro Skyscan Goto Mount

I thought the Skywatcher EQM35 Skyscan Goto Mount would be an ideal entry into nightsky imaging following the little that I have managed to get done with the Star Adventurer after 3 years of owning it. This larger mount would drag my reluctant sorry little ass into astrophotography slowly but surely.

EQM 35 will allow simple star tracking and nightsky photography with current DSLRs that I own with the added ease of Skyscan and Goto capabilities. And when I am done and ready with that it will also allow for more serious astrophotography with flatfield apochromatic ed triplet proper telescope attached to a DSLR for more dedicated astro imaging. That's the plan trajectory anyways, has been for the past 6-8 years.

After Star Adventurer, this heftier unit should be able to handle the use of the Sigma 300/2.8 and the EF400/4.0. The EF400/4.0 was originally purchased when it came out with the intention of picking up Orion's Nebula but was never actually tested on the Adventurer after some weight considerations. The EQM35 which is heftier is rated to be able to carry up to 10kg load so it might just be possible.


The completed package for observing with telescopes as well as imaging.

EQM 35 for nightsky tracking and imaging with DSLR.

The business end of star tracking.


The foldable travel tripod for the EQM35 mount, nifty folded size for travel when the need arises.

The above set up should be able to cover Milkyway widefield as well as deeper targets. With the Adventurer it may be slightly risky to use the long heavier SLR lenses and DSLR due to weight considerations, I'm sure how the motors would behave with larger load.

The following is possibly the route that will be taken for astro imaging if all goes well and according to plan:

Skywatcher Esprit 100ED Super APO Triplet Refractor (includes 3" focuser, 2" diagonal and finder scope with right angle viewer).

Field flattener

Adapter from field flattener to Canon EOS mount.

Canon EOS77 Astro APC camera wo IR cut Filter, 24 MP, Digic 7


And these hopefully will be able to target these as part of the earning curve to master going futher into astro imaging :


Andromeda

Orion's Nebula

Pleiades

Considering that they are only 7 days of clear sky in total with a dark night here in Norway, it'll be a while yet before these objects get their due coverage. Maybe the sun could also be a viable target, in that case a 150mm sun filter would be required. For  both the Sun and the Moon, a 2x Barlow might be useful to achieve 1100mm.


The night Aurora G2 Storm Never Came

It's not the first time all the fillibuster about the massive CME coming our way broken by one portral spread like wildfire by others got folks all excited about an aurora that might show all the way south to NYC. If it's gonna hit NYC it'll definitely be a big show in Stavanger, KP5 is an event, KP6 you can watch from your porch from anywhere in the city.

A few hours before nightfall doubts started to permeate. Then a couple of posts about how it might not actually take place at the estimited time. Even SolarHam put out a post about how the CME on Wednesday might be directed away from the earth and how it's travelling at slower speed that earlier projected.

Having stumbled upon aurora in Stavanger a few years back while photographing Milkyway in Sele, posted a timelapse of it on Stavanger Aurora Chasers (created by a friend who was excited about the phenomenon), I have experienced this anti-climax many times having relied purely on published CMEs and forecasts. After numerous instances of freezing under subzero temperatures in the oddest locations I've grown wary of predictions, and almost never relied on any of those aurora apps.

These days, I only go out if I've actually seen it myself or have seen photos of it being seen. No more predictions. I much more enjoy looking at the night sky with the stars and Milkyway. If there's aurora I'll record it. It cold sitting around waiting for an aurora in the middle of the night in winter. It's colder still if aurora never came.


All shots with EF50/1,2 on Canon 6D: WB=5000K, Curves tweaked in CaptureOne.

Tuesday, March 19, 2019

Light Pollution over Hinna aka Shooting the sky with Star Adventurer

I have had the Skywatcher Star Adventurer for almost three years now, bought it possibly at the same time I bought my Sony A7S. It took a while to actually take it out and use it in the field. It was used for the first time finally for shooting Milkyway in Sulaskard and Maudal, and I was very happy with the results.

This year I'm using it quite a bit more than past years. With several clear sky nights this winter I managed to get more familiar with aligning the Adventurer to the Polaris. Because Milkyway is not yet quite optimum for shooting this time of year I have been targetting other bright objects in the sky.

In winter over in the Northern hemisphere, winter time means the most obvious targets are Orion, Gemini, Leo, Auriga and several other constellations. In Orion you have the Orion sword where the most obvious is the Orion's nebula. In Leo and Auriga you have the stars Regulus and Capella.

Stack shots on Sequator then PP.

Single shots.


Armed with the Sony A7S and Canon 6D, I shot different parts of the night sky with a range of lenses from 50mm to 400mm. Partly to test the limits of the Adventurer and partly to see what I can get from widefield photography using these lenses.

It was quite OK with Regulus and Capella all the way up to  Sigma Art 135mm, shooting at a max of 30secs tracking on the Adventurer.  Decent shots without any star trailing were bagged. Not so successful with the Tamron 200/3,5 Macro ... yes, it's a flatfield but it wasn't getting infinity focus. Samyang 85 did well too. I also tried EF 400/5,6. Zero trailing all the way to 20 seconds was possible though I have not yet pushed it all the way to 30 secs. Andromeda still escapes me, it has so far been hiding behind some neighbour's houseroof.


Auriga with the bright Capella, 135/1.8 pointed straight up.

The biggest drawback from shooting from home aside from lack of motivation and clear sky in my humble opinion is light pollution. Shooting Orion from within the city limits you'd expect some of it if not a lot of it. Matters were made worst by the fact that by nightfall Orion hovers exactly above the bright lights from where I was shooting, there's no escaping this atrocity as the shots above can testify.

From this, I gathered several important lessons :
1. There's light pollution everywhere.
2. Adventurer can carry lenses up to Canon EF400/5.6 and even the bulky Sigma Art 135/1.8.
3. Good Polaris alignment gets crucial as you switch to longer focal lengths.
4. Exposure (bright pointy light objects surrounded by a black background) seems a very fine balancing act when you shoot multi frames for stacking. PP skills too.


Orion's Nebula with EF400/5,6 after small tweaks on PS and stacked 3 shots on Sequator.

Same  region, stacked 60 shots from 6D on Sequator all options on. Shot using  Sigma 135/1.8
Zooming in closer with EF400/5,6, stacked 100 shots on Sequator, cropped

To be fair, I have not really put the Adventurer through it's paces. Next few clearsky nights could see the Adventuer being pushed further together with the 400/5,6. Maybe even use the counterweights provided and try shoot with the EF400/4 or Sigma 300/2,8.

Within the same trajectory of trying to better image the nightsky as well as trying to learn more about the many facets of wide field imaging, I recently ordered the Skywatcher EQM35 Skyscan Goto mount. Being of modular design, half of it would enable better tracking with heftier lenses (ie. 70-200/2,8, 400/4,0 and 300/2.8) while the other half should provide  a good starting base for a proper telescope.

Though the leap isn't as big as I had originally planned when I started ie. imaging with a dream Stellarvue telescope with obviously many more holes of knowledge to be filled in, I think I've made some progress at least. Considering the more or less only 5 months dark nights, with only 7 nights of which is suitable for imaging, I think the slow transition is reasonable.

I was listening to this while writing this post.
Moon

I haven't been photographing the moon for a while since the connection of the EF40/2.8 to the EOS100D went bad. I was no longer able to utilise the 77 scope to shoot the moon with the EOS100D which was my standard birding digiscope setup, useful for close ups of the moon.

This shot was taken with the EF400/5,6 on a Canon 6D and cropped in post processing.


Stormy Winter

While we were fast moving forward Spring, suddenly for a few days over the weekend Winter poked it's head unexpectedly. Temperatures quickly drop to subzero chill overnight. These shots were captured the evening post storm. The moisture laden clouds quickly dissappeared however the cold temperatures stayed well past the weekend.


Saturday, March 16, 2019

I made my first raspberry ricotta cheesecake

Bon Appetit popped up a simple cheesecake recipe one day ... and the next it was chiselled in my head that I just had to have one. By the end of the weekend I made 2 ricotta cheesecakes and was well beyond my allowed sugar intake for the week!

Aisya helped sort out the terms in the recipe which I don't quite grasp. Next weekend we are making blueberry cheesecake!


Tuesday, March 12, 2019

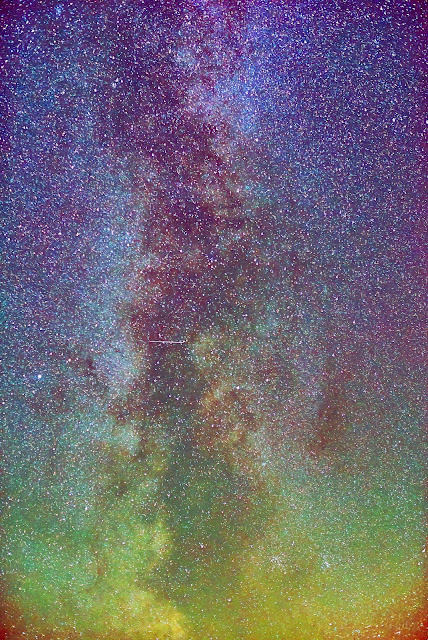
Reworking Sola Milkyway Aug 2017 (into true color cosmos asccording to Clarkvision)

Some may argue that the night sky is a muted cool blue, however not so according to Clarkvision. This is my attempt at tweaking the usual muted coolblue Milkyway night into true color cosmos as per workflow prescribed by Clarkvision. Though not exactly the same, these images  were tweaked to see what colors are lurking under the high dynamic range captures from the Raw image files from the Canon 6D.

These Milkyway shots were originally imaged at Sola Beach next to Sola airport back in August 2017. The LP you see is from the airport lights. That night Milkyway spanned majestically above Olberg in a NorthEast-SouthWest direction.


From this point of view, Viste looks to be a good spot for Milkway sandwiched between Sola LP to the north and Sele/Bore LP to the South.


Original pp image from Aug 2017


Several shots taken around the same period  at Orrestrand with an even more severe lp from warmhouses from the south were completely unrecoverable. Shots in Hinna using CLS lp filter from Astronomikk were also found to be unrecoverable due to the shifted colors.

Shooting at Daylight WB (4000-5200) without filters showed greater chance of rescue to achieve true cosmic colors. In these shots the RGB, Red, Green, Blue curves tend to clump together which makes tweaking Red, Green, Blue curves individuslly possible thus exerting greater control over each of the color band. It's harder to tweak the colors when the Red, Green, Blue curves are spread out over different ranges of the x-axis of the color curves especially if they don't have overlaps.

I'm still discovering the nuances of these cosmic true color tweaking ... from mucking about thus far the possibilities are rather extensive as well as subjective. A cosmically active night sky may not have the same colors of a relatively quiet night (cosmically speaking).

Sunday, March 10, 2019

Reworking Sep 2017 nightsky following Clarkvision (true colorful sky instead of coolblue sky)

Post processing astro photos can be a tiresome business. Depending on the activities of the cosmos during the night of the shot there can be many variations to the outcome. Clarkvision goes against the many conventional wisdom about post processing astro shots that you find in mainstream photography magazines and/or over the numerous sites on the internet.

"30 secs, f/2.8, Iso 6400, cool blue tungsten corrected night sky" are typical recommendations you find. Our man Clark is pretty adamant about how wrong these assumptions are and he's got sound scientific reasoning, detailed workflows and great images he's made himself to back it all up. If you have a resilient mind and strong desire to learn pop over to his domain : www.clarkvision.com

He broke many of my long held vision about how the nightsky should look like and along the way I learnt quite a few nifty things about astro post-processing from his website. Though I've been reading his websites for a couple of years I still have a small headache from trying to digest the points he's putting across. Don't do it in one go and be ready to blow your mind!

For a long time I always have intended to modify my Canon 40D and now 6D to get rid of the IR filter and get true reds from my astro shots just as I have seen them from many others on the forum. Then Clark came along ...

"Modifying digital cameras is not necessary to obtain great astrophotos. Many stock cameras have good hydrogen-alpha response, e.g. recent Canon DSLRs. More important than a modified cameras is proper post processing methods that will bring out and not suppress hydrogen alpha emission, and cameras with good sensitivity and very low thermal dark current. The best digital camera for deep sky astrophotography that I have evaluated has good sensitivity, including hydrogen-alpha, and amazingly low dark current is the Canon 7D Mark II 20-megapixel digital camera. A great full frame digital camera for astrophotography is the Canon 6D 20-megapixel digital camera." - Clark

And what do you do know : I have both the 6D and the 7D Mk2!


Original Raw Shot.

Raw processed in CaptureOne, tweaked in Photoshop.


Key differences (during Raw processing in CaptureOne) from previous post-processing are: 
1. Tweak curves for RGB, Red, Green and Blue individually
2. WB 3800, Tint 1,1
3. Chromatic correction according to lens 20%
4. Highlight 50%, Shadow 50%
6. Luminosity 80%, Detail 20%, Color 20%

Further tweaking in Photoshop (PS12) are for these minor tweaks:
1.  Adjust Colors : Hue 0% Saturation 40-60%, Lightness 0%
2.  Adjust Color Curves : Increase Contrast
3.  Adjust Lighting : Tweak to lighten or darken to taste
4.  Resize Image (no sharpening done)

All these shots were taken with Sony A7S in combination with a Sigma Art 35/1.4 or Canon EF 50/1.2. I have some shots from the Canon 6D as well at the end for comparison. Canon 6D and 7D Mk2 were specifically mentioned by Clark as the best cameras for astrophotography, I didn't notice whether he made a mention of Sony A7S ... apparently Sony is a star eater according to some users.

I put through these Milkway shots from Maudal taken 23rd Aug 2017 with Canon 6D +EF 24/1.4 through the same paces of Raw post processing in CaptureOne and the remaining tweaks in PS12.

Different nights produce different atmospheric activities, it's great to be able to record these subtle differences in color. Airglows galore especially during those active nights, definitely better than just light pollution!